
Free Resource
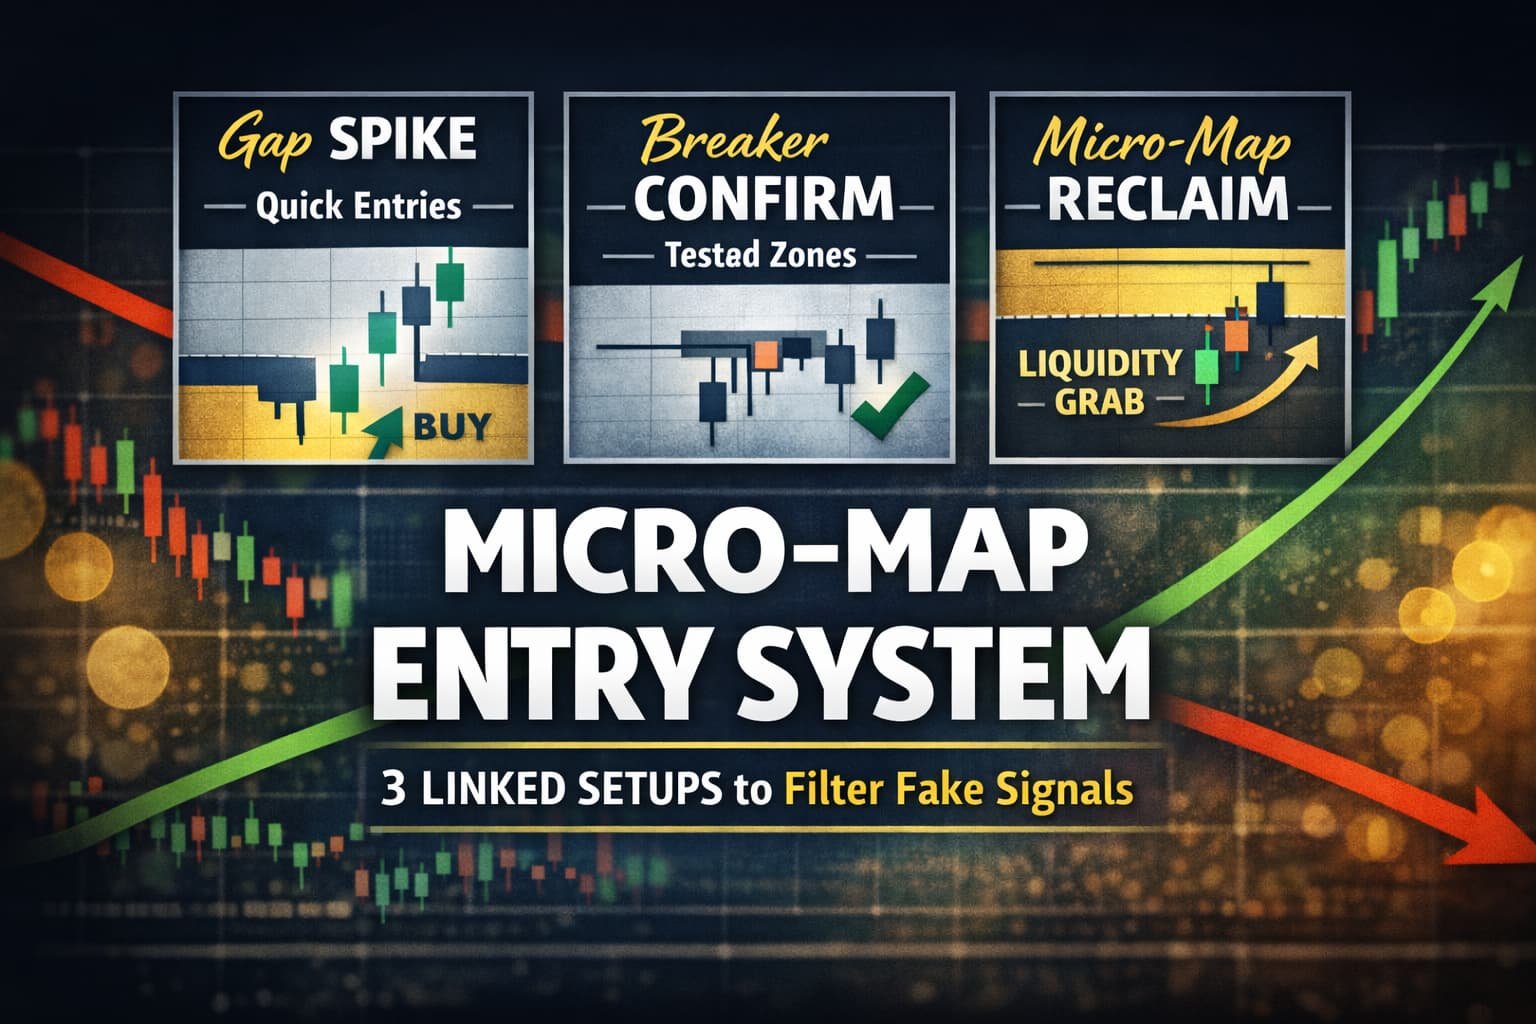
Micro-Map Entry System: 3 Linked Setups That Reduce Fake Signals
If you’ve ever seen 20 “valid” setups in a day and somehow managed to pick the 12 that stop out, congratulations, you’re experiencing the default retail experience.
This guide compresses a long, messy teaching transcript into a clean system: three connected setups and the filters that make them usable.
The big idea is simple:
These patterns aren’t “magic strategies.” They’re candle-based ways to read market structure, liquidity sweeps, and inefficiencies (gaps). The edge comes from filtering, not memorizing shapes.
What you’ll learn (fast)
- Setup 1: “SPI” (Gap Spike) for frequent opportunities, lots of fakes if unfiltered
- Setup 2: “BTB” (Breaker Confirmation) adds a candle-confirm trigger and partial entry logic
- Setup 3: Micro-Map (Structure Reclaim) fixes the biggest flaw: entering too early during stop hunts
- The filters: when NOT to trade even if the pattern appears (this is the real value)
Cheat sheet: how the 3 setups relate
| Setup | What it tries to capture | Trigger style | Main problem | What fixes it |
|---|---|---|---|---|
| 1) SPI (Gap Spike) | Gap impulse continuation | Pending order under/over wick | Too many signals, many are fake | Better filters + context |
| 2) BTB (Breaker Confirm) | Reaction at a “breaker” + gap zone | Confirmation candle + optional 50% entry | Still can enter during chop | Session + structure filters |
| 3) Micro-Map (Reclaim) | Sweep + reclaim = direction confirmed | Break of reclaim level (structure) | Fewer signals (good) | Combine with filters for quality |
Core concepts (in English, not mysticism)
You’ll see these words a lot:
- Gap / inefficiency: a strong impulse that leaves a “fast move” zone behind (often revisited)
- Liquidity sweep: price briefly breaks an obvious high/low to trigger stops, then reverses
- Structure shift: the market breaks a meaningful swing level (change of character / break of structure)
- Session timing: patterns behave differently when liquidity is thin vs active
Helpful reference (if you want definitions without getting brainwashed):
- Investopedia (search “liquidity”, “market structure”, “break of structure”)
- BabyPips market sessions tool: https://www.babypips.com/tools/forex-market-hours
Setup 1: SPI (Gap Spike) in 60 seconds
This is the “lots of opportunities” setup. It’s also the “lots of fake opportunities” setup if you take everything.
What it looks like (bullish version):
- You get a short burst of 3 candles pushing up.
- A gap/inefficiency forms in that push.
- You place a pending buy near the wick zone (typically under the wick of the last impulse candle).
- Stop goes behind the impulse base.
- Target is the next obvious push level.
How to execute (simple steps):
- Identify an impulse that created a gap/inefficiency.
- Place a pending entry near the wick area (where a retest would “tap” you in).
- Stop behind the base candle (the one that started the move).
- Target the next liquidity (prior highs, equal highs, or next zone).
Reality check:
- You’ll see many SPI signals (every 5–10 candles in active conditions).
- A lot will stop out if you don’t filter.
SPI is quantity. If you don’t filter, you pay for that quantity.
Setup 2: BTB (Breaker Confirmation) as an upgrade
BTB adds a “confirmation candle” entry so you’re not blindly pending into noise.
What it’s trying to do:
- Price creates an impulse + gap.
- Later, price comes back toward the start of the gap (or a breaker zone).
- Instead of entering immediately, you wait for a confirmation candle (often pin-style rejection).
Execution steps:
- Mark the gap start / breaker area.
- Wait for price to return into the zone.
- Look for a clear confirmation candle (rejection or strong close away).
- Enter on that confirmation close (or on break of its wick, depending on your rules).
- Optional: add a second entry at 50% of the SPI zone (improves RR, but can increase noise).
Why BTB still fails sometimes:
- Confirmation candles inside a range are worthless.
- If the session is dead (thin liquidity), you get random spikes.
Setup 3: Micro-Map (Structure Reclaim) the “stop hunt antidote”
This is the most important part of the transcript.
Micro-Map is basically: “Do not enter until the market proves the sweep is done.”
Bullish Micro-Map (clean version):
- A bullish impulse happens (gap/inefficiency shows buyers stepped in).
- Price pulls back and sweeps a local low (collects liquidity).
- You still do nothing.
- You wait for structure to reclaim upward (break of a meaningful swing level).
- Entry is triggered when price breaks the high of the reclaim candle (or the next pivot).
- Stop goes under the sweep low.
- Target is the next liquidity pool or opposing zone.
Why it’s better than BTB:
- BTB can still bait you into entering during the sweep.
- Micro-Map forces “sweep first, reclaim second, entry third.”
If you enter before reclaim, you’re still trading inside the hunt.
Micro-Map entry trigger (the A → B logic)
This is the candle sequence described in the transcript, simplified:
- Candle A sweeps below the prior low (liquidity grab).
- You place a buy-stop above Candle A (or wait for Candle B).
- If Candle B forms and the market still looks unstable, you move the trigger to Candle B’s high.
- You enter only when that high breaks (confirmation via reclaim).
This “moving trigger” is a practical way to avoid early entries.
The filters (this is the part that actually boosts win rate)
The transcript repeats one message over and over in different words: not every Micro-Map is tradable.
Here are the filters in clean English.
Filter 1: Candle close inside the gap = weak pressure
If price comes back into the gap zone and closes deep inside it, that suggests the original buying pressure was not strong enough to defend the zone.
Skip or downgrade the setup when:
- Price penetrates the gap and closes inside the “protected” area.
- Multiple candles keep re-entering the same zone (it’s being consumed, not defended).
Quick rule:
- One touch + rejection can be fine.
- Repeated deep closes usually means “this zone is not respected.”
Filter 2: Trade only with structure shift + meaningful location
Micro-Map is strongest when:
- You see a real structure shift (break of a swing that matters), AND
- Price is reacting at a meaningful area (e.g., mitigation/internal level, prior move origin, key swing zone)
Skip when:
- The pattern forms mid-leg with no structure shift.
- It appears in the middle of nowhere.
Filter 3: Avoid range traps (inside-bar chop)
If candles are stacking inside each other (tight range / inside-bar behavior), you’re not getting intent. You’re getting random flickers.
Skip when:
- Multiple candles sit inside a narrow band.
- Price “plays ping-pong” without displacement.
Timing rules (because liquidity matters)
The transcript repeatedly emphasizes: don’t trade every hour just because you’re awake.
Practical rules:
- Prefer high-liquidity windows (often London / New York overlap behavior).
- Avoid low-quality hours where price chops and hunts randomly.
- Avoid late-session boredom trades (quality drops).
Session tool (useful): https://www.babypips.com/tools/forex-market-hours BabyPips
Putting it together: the workflow
Use this as your “trade decision ladder”:
- Context: trend + where you are (are you near something meaningful?)
- Pattern: SPI / BTB / Micro-Map appears
- Filters:
- Did price close deep inside the zone?
- Do you have structure shift?
- Are you stuck in a range?
- Is session liquidity decent?
- Entry: reclaim trigger only (don’t front-run the sweep)
- Risk: stop behind sweep, target at logical liquidity
Quick comparison: when to use which
- Use SPI when you want frequency AND you’re strict with filters.
- Use BTB when the market respects zones and confirmation candles are clean.
- Use Micro-Map when you’re tired of being the liquidity.
Most people should start with Micro-Map because it’s hardest to abuse.
FAQ (because humans always ask the same things)
Q: Is Micro-Map only for “pros”?
A: It’s easier for experienced traders because it requires patience and context. But beginners can use it if they trade demo/small, follow the filters, and stop trying to trade every signal.
Q: Why do I still get stopped even with Micro-Map?
A: Because it’s a market, not a vending machine. Most failures come from bad context (mid-range, no structure shift, trading dead hours) or placing stops too tight (not behind the sweep).
Q: Do I need to memorize candle patterns?
A: No. The point is understanding: sweep → reclaim → entry. Candles are just how you observe it.
Copy/paste: Micro-Map journal template
- Instrument + timeframe
- Context (trend / key zone)
- Sweep level taken (which high/low)
- Reclaim level (which swing broke)
- Entry trigger (break / retest)
- Stop location (behind sweep)
- Target logic (next liquidity / opposing zone)
- Session window
- Result + screenshot
- Notes (range? deep closes? weak pressure?)